You might also like…


Hardwood floor gaps can be complicated. They’re caused by a variety of things, and learning how to fix hardwood gaps might not actually solve the real problem with your floor! But don’t worry: You can learn all about hardwood flooring gaps, what causes them, and what you should do about them in this video.
The weather can wreak havoc on more than the exterior of your home. As the humidity changes, it’s common for a hardwood floor gap to form and appear in hardwood floors.
We take gapping very seriously in the flooring business. But there’s good news – gaps aren’t always the end of the world. Today, we’ll help you understand hardwood gaps, and what they might be telling you about your floor. Plus, we’ll talk filling hardwood floor gaps, and why it’s not as great an idea as you might think.
What are Hardwood Floor Gaps?
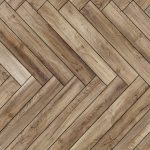
Flooring gaps are just that – gaps. A noticeable separation between two or more boards in a room, or throughout your house.
Some homeowners get nervous about gaps the thickness of a sheet of paper. But any expert will tell you that’s no big deal. Gaps are an expected seasonal change in hardwood floors. But, whether it’s a hairline gap or something bigger, it’s important to know what you’re dealing with sooner rather than later.
Humidity is the single biggest contributing factor to floor gaps. In the summer months, with windows open and more humid air throughout your home, hardwood floor can start to expand. Conversely, heating your home in the winter makes air dryer, which causes wood to shrink. So, changing humidity levels naturally leads to gaps.
Assuming your HVAC is working properly, you won’t see major gapping. What you will see is some seasonal gapping from things like turning the heat on in winter months, which lowers your home’s humidity. They’ll generally close back up on their own.
If the humidity is too low in your home, you’ll see more significant gaps. If you don’t have an HVAC, you can address your home’s moisture level by getting a de-humidifer / humidifier.
You can choose to use room humidifiers or furnace humidifiers – either way, it’s a simple way to minimize the chance of gaps showing up in your floors down the road.
Hardwood Flooring Gaps: Pre-Installation
Whether you haven’t purchased your wood floors yet, or are thinking about a new renovation project for your home, here a few things to know about gaps, pre-installation:
- How wide are your floor planks? Wider planks are trendy, but actually shrink more noticeably than narrower planks, due to their larger size.
- When selecting a wood floor, know that flat-sawn flooring will gap more than rift-sawn. The reasons why involve some technical info about tree cutting and grain patterns. Flat-sawn floors are still a great, stylish choice – just know that they tend to show more seasonal gapping.
- Lastly, when it comes to hardwood flooring, it’s best to hire a professional installer. Hardwood is expensive, and a long-term investment. You want someone who knows how to anticipate the natural expansion and contraction of your flooring.
Nail-Down Floors and Gaps
You will see gapping in a nail-down floor. Period. Normal gaps can vary in width from “hairline” up to the thickness of a dime. (Note: THICKNESS, not WIDTH!) Little gaps like that actually tell you that your floor is working properly. They don’t need to be filled – just make sure you vacuum them out once in awhile. But, if you’re seeing wider gaps, or consistent gapping throughout your floors, that’s bad.
How was the floor installed? If it’s nail down flooring, the nail pattern will affect gapping. Fewer nails can mean bigger gaps. Of course, too many nails will split your wood. Again, use a professional!
If you’re seeing major gaps, and humidity, installation, and other factors have been ruled out by a flooring expert, it could actually be a subfloor problem. Which would be even less fun to fix.
Floating Floors and Gaps
Floating floors typically experience fewer gaps than nail-down. If you ARE seeing gaps, it’s likely because the floor is “pinched” somewhere. Meaning something is stopping it from moving and expanding as intended.
This happens for a few reasons:
It could be because you haven’t left a proper hardwood floor expansion gap in your installation. If your floor can’t move into its expansion gaps, it generally creates a “V” and starts to split.
Or, you might have laid down too much floor without a transition point (or t-cap), resulting in an oversized, connected amount of flooring that can’t move properly, leading to pinching in certain areas.
It could also be the “click-lock” system – if someone’s damaged the floor locking mechanism during installation, it could just be as simple as replacing a couple defective planks – a fairly simple task on a floating floor.
Another common problem is heavy furniture. Are your kitchen island and cabinets installed directly on top of your floor? The added weight may be stopping your floor from moving correctly.
Finally, if the actual subfloor floor isn’t level, the floor will start to bend, which damages the click-lock joint. Over time, that wear and tear can cause the planks to come apart.
In a floating floor, you really don’t want any gaps at all. If you only notice a hairline gap when you’re laying face down on the floor – as one does – it’s fine. But if you can see it from a standing position in normal light, it’s probably worth looking at.
How to Fix Hardwood Floor Gaps
If it isn’t a major issue, and it falls into the acceptable ranges we talked about before, you generally do not fix a floor gap. It closes up by itself – no muss, no fuss. But here are three ways you can deal with gaps at home.
1) Identify the problem. For nail-down, it’s most likely going to be humidity. Check your HVAC, and have it serviced if required. If you don’t have an HVAC, get a de-humidifer/humidifier to regulate the moisture in your home.
2) If one or two specific planks are showing major gaps, but everything else looks good, you can typically just replace the affected area with new boards. This is a pretty quick project, and no problem at all for a professional installer. Trust me – they’ve seen it all before.
After installation, you might notice some small gaps around the “butting” at the edges of your floors. These aren’t major problems, and you can easily fill them yourself. Just use a colour crayon or fill stick.
Filling Hardwood Floor Gaps?
“Filling” gaps in floors isn’t really done anymore. It’s a patchwork fix from an older era, where manufacturers couldn’t control the board-to-board quality as closely as they do today.
We don’t recommend filling any hardwood gaps – over time, if your floor is working properly, the wood will expand and push the fill out anyway. Or, you create a new problem where your fill stops the floor from expanding, causing the wood to buckle. Which isn’t great.
Today, if you’re seeing major, non-humidity related gapping, it’s generally best to call in a flooring professional to assess what’s going on.

 (1 rating, average rating is 4.00/5)